: A Flavorful Vietnamese Delight")
: A Wholesome Vietnamese Delight")
: A Nutritious and Delicious Vietnamese Delight")


DIY Hair Pomade and Its Benefits
Understanding Hair Pomade and Its Uses
Hair pomade has been a staple in men’s grooming for decades, offering a versatile solution for styling hair. Unlike gels or sprays, pomade provides a flexible hold with a natural shine, making it ideal for creating sleek, polished looks or textured, messy styles. It is particularly popular for hairstyles like pompadours, side parts, and quiffs. However, commercial pomades often contain synthetic chemicals and preservatives that can damage hair over time. This has led many people to explore DIY hair pomade as a healthier, more customizable alternative.
Creating your own hair pomade at home allows you to control the ingredients, ensuring that only natural, nourishing components come into contact with your hair and scalp. Additionally, DIY pomade can be tailored to suit specific hair types and styling needs. Whether you have fine, thick, curly, or straight hair, a homemade pomade can be adjusted to provide the perfect balance of hold, shine, and texture.
The Benefits of Making Your Own Hair Pomade
One of the most significant advantages of DIY hair pomade is the ability to avoid harmful chemicals found in many commercial products. Ingredients like parabens, sulfates, and synthetic fragrances can strip hair of its natural oils, leading to dryness and breakage. By making pomade at home, you can use natural oils, butters, and waxes that nourish and protect your hair while providing hold and shine.
Another benefit is cost-effectiveness. High-quality pomades can be expensive, especially if you use them regularly. DIY pomade recipes often require only a few simple ingredients, many of which you may already have in your kitchen or pantry. This makes it a budget-friendly option for those who want to maintain a well-groomed appearance without breaking the bank.
Customization is another key advantage. Commercial pomades come in a limited range of formulas, but when you make your own, you can experiment with different ingredients to achieve the exact hold, shine, and scent you prefer. For example, beeswax provides a strong hold, while shea butter adds moisture and a subtle sheen. Essential oils can be added for fragrance, allowing you to create a pomade that suits your personal style.
Common Ingredients in DIY Hair Pomade
The ingredients used in DIY hair pomade are typically natural and easy to source. Beeswax is a common base ingredient, as it provides a strong hold and helps the pomade maintain its shape throughout the day. Carrier oils, such as coconut oil, jojoba oil, or olive oil, are added to soften the wax and make the pomade easier to apply. These oils also nourish the hair and scalp, promoting healthy hair growth.
Butters like shea butter or cocoa butter are often included for their moisturizing properties. They add a creamy texture to the pomade and help prevent hair from becoming dry or brittle. Essential oils, such as lavender, peppermint, or cedarwood, can be used to add a pleasant scent and provide additional benefits like soothing the scalp or stimulating hair follicles.
Why DIY Hair Pomade is Worth Trying
For those who value natural, chemical-free grooming products, DIY hair pomade is an excellent choice. It allows you to take control of what you put on your hair, ensuring that it remains healthy and strong. Additionally, the process of making pomade at home can be a fun and rewarding experience. It provides an opportunity to experiment with different ingredients and create a product that is uniquely suited to your needs.
In the next part, we will explore the tools and ingredients needed to make your own hair pomade, as well as step-by-step instructions for creating a basic recipe. Whether you are a seasoned DIY enthusiast or a beginner, this guide will help you get started on your journey to creating a high-quality, natural hair pomade at home.
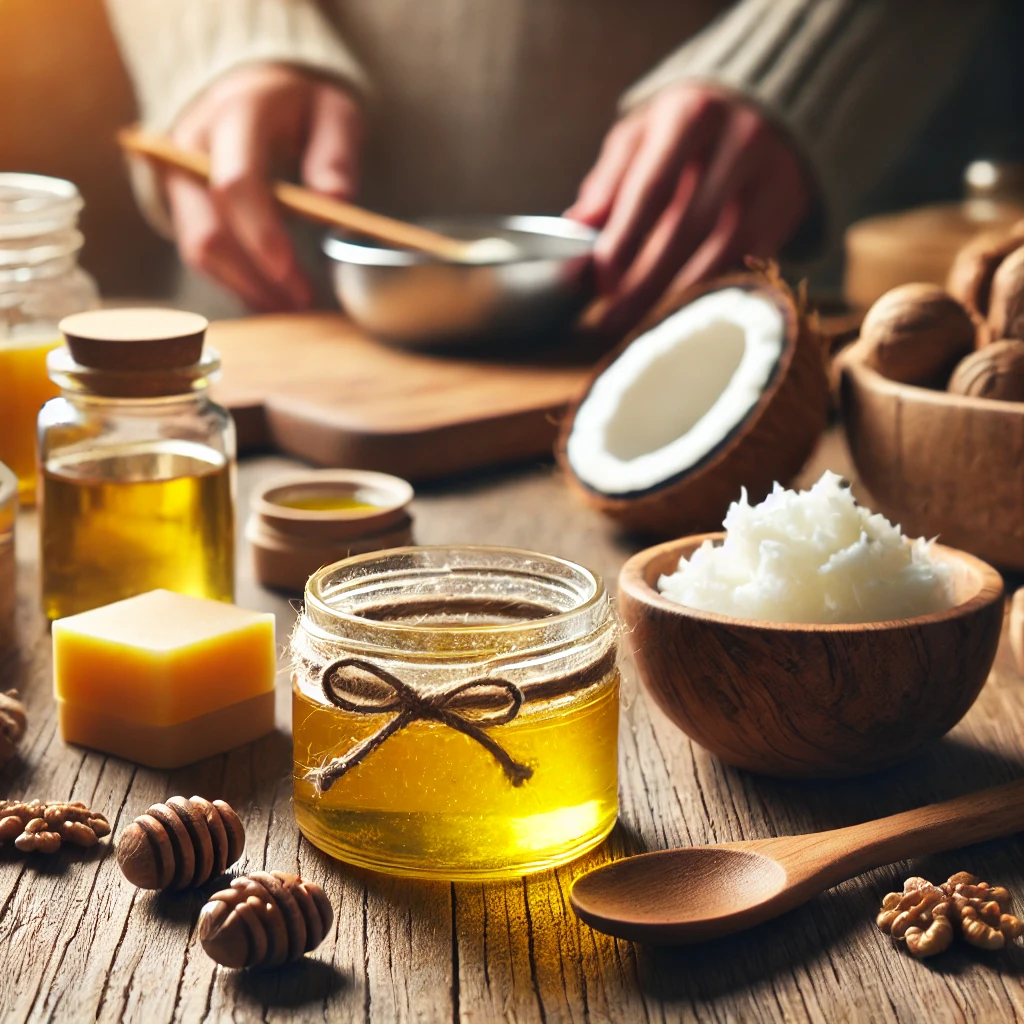
Tools and Ingredients for Making DIY Hair Pomade
Essential Tools for DIY Hair Pomade
Before diving into the process of making hair pomade, it is important to gather the necessary tools. While the ingredients are the star of the show, having the right equipment will make the process smoother and more efficient. A double boiler is one of the most important tools, as it allows you to melt the ingredients gently without burning them. If you do not have a double boiler, you can create one by placing a heatproof bowl over a pot of simmering water.
A kitchen scale is also useful for measuring ingredients accurately, especially when working with beeswax, which needs to be measured precisely to achieve the desired consistency. A whisk or spatula will help you mix the ingredients thoroughly, ensuring a smooth and even texture. Additionally, you will need containers to store the finished pomade. Small jars or tins with airtight lids are ideal, as they prevent the pomade from drying out and make it easy to apply.
Key Ingredients for DIY Hair Pomade
The ingredients used in DIY hair pomade are simple and natural, making it easy to create a product that is both effective and gentle on your hair. Beeswax is the most common base ingredient, as it provides a strong hold and helps the pomade maintain its shape. It is available in most health food stores or online and is relatively inexpensive. When choosing beeswax, opt for a high-quality, unrefined product to ensure the best results.
Carrier oils are another essential component of DIY pomade. Coconut oil is a popular choice due to its moisturizing properties and pleasant scent. It is also lightweight, making it easy to distribute through the hair. Jojoba oil is another excellent option, as it closely resembles the natural oils produced by the scalp, making it highly nourishing. Olive oil can also be used, although it has a heavier texture and may be better suited for thicker hair types.
Butters like shea butter or cocoa butter are often added to DIY pomade for their moisturizing and conditioning properties. Shea butter is particularly beneficial for dry or damaged hair, as it helps to restore moisture and prevent breakage. Cocoa butter has a rich, chocolatey scent and provides a creamy texture to the pomade. Both butters are widely available and can be found in most health food stores or online.
Essential oils are optional but can be a great addition to DIY pomade. They add a pleasant fragrance and can provide additional benefits for the hair and scalp. For example, lavender oil has a calming scent and can help soothe an irritated scalp, while peppermint oil has a refreshing aroma and can stimulate blood flow to the scalp, promoting hair growth. Cedarwood oil is another popular choice, as it has a woody, masculine scent and is believed to strengthen hair follicles.
Step-by-Step Instructions for Making Basic DIY Hair Pomade
To make a basic DIY hair pomade, start by gathering your ingredients and tools. You will need 2 tablespoons of beeswax, 2 tablespoons of coconut oil, 1 tablespoon of shea butter, and 10-15 drops of your preferred essential oil. Begin by setting up your double boiler and placing the beeswax in the top bowl. Allow it to melt slowly, stirring occasionally to ensure even melting.
Once the beeswax has melted, add the coconut oil and shea butter to the bowl. Stir the mixture continuously until all the ingredients are fully combined and the texture is smooth. Remove the bowl from the heat and allow the mixture to cool slightly. At this point, you can add the essential oils, stirring well to distribute the fragrance evenly.
Pour the mixture into your chosen containers and allow it to cool completely before sealing the lids. The pomade will solidify as it cools, so it is important to work quickly when transferring it to the containers. Once the pomade has set, it is ready to use. Simply scoop a small amount onto your fingers, warm it between your hands, and apply it to your hair as needed.
Tips for Customizing Your DIY Hair Pomade
One of the great things about making your own hair pomade is the ability to customize it to suit your specific needs. If you prefer a stronger hold, you can increase the amount of beeswax in the recipe. For a lighter hold, reduce the beeswax and add more carrier oil. You can also experiment with different combinations of carrier oils and butters to achieve the desired texture and shine.
Adding essential oils is another way to personalize your pomade. Choose oils with scents that you enjoy and that complement your natural body chemistry. You can also mix and match oils to create a unique fragrance. For example, combining lavender and cedarwood oils creates a soothing, woodsy scent, while peppermint and citrus oils create a fresh, invigorating aroma.
In the next part, we will explore advanced DIY hair pomade recipes, including options for different hair types and styling needs. Whether you have fine, thick, curly, or straight hair, there is a DIY pomade recipe that will work for you.
Advanced DIY Hair Pomade Recipes for Different Hair Types
Pomade for Fine or Thin Hair
Fine or thin hair requires a lightweight pomade that provides hold without weighing the hair down. A recipe for fine hair might include 1 tablespoon of beeswax, 2 tablespoons of jojoba oil, and 1 tablespoon of argan oil. Jojoba oil is lightweight and closely resembles the natural oils produced by the scalp, making it ideal for fine hair. Argan oil is rich in vitamins and antioxidants, which help to nourish and strengthen the hair.
To make this pomade, melt the beeswax in a double boiler, then add the jojoba and argan oils. Stir the mixture until it is smooth and well combined. Remove from heat and allow it to cool slightly before adding 10 drops of essential oil, such as rosemary or tea tree oil, which are known for their hair-strengthening properties. Pour the mixture into containers and allow it to set before use.
Pomade for Thick or Coarse Hair
Thick or coarse hair requires a heavier pomade that can tame frizz and provide a strong hold. A recipe for thick hair might include 3 tablespoons of beeswax, 2 tablespoons of shea butter, and 1 tablespoon of castor oil. Shea butter is highly moisturizing and helps to soften coarse hair, while castor oil is thick and sticky, providing a strong hold and adding shine.
To make this pomade, melt the beeswax and shea butter in a double boiler, then add the castor oil. Stir the mixture until it is smooth and well combined. Remove from heat and allow it to cool slightly before adding 10 drops of essential oil, such as cedarwood or sandalwood, which have a rich, masculine scent. Pour the mixture into containers and allow it to set before use.
Pomade for Curly Hair
Curly hair requires a pomade that provides hold without causing stiffness or crunchiness. A recipe for curly hair might include 2 tablespoons of beeswax, 2 tablespoons of coconut oil, and 1 tablespoon of mango butter. Coconut oil is lightweight and helps to define curls, while mango butter is rich in vitamins and fatty acids, which help to nourish and moisturize curly hair.
To make this pomade, melt the beeswax and mango butter in a double boiler, then add the coconut oil. Stir the mixture until it is smooth and well combined. Remove from heat and allow it to cool slightly before adding 10 drops of essential oil, such as ylang-ylang or geranium, which have a floral scent that complements curly hair. Pour the mixture into containers and allow it to set before use.
Pomade for Straight Hair
Straight hair requires a pomade that provides a sleek, polished look without making the hair look greasy. A recipe for straight hair might include 2 tablespoons of beeswax, 2 tablespoons of jojoba oil, and 1 tablespoon of cocoa butter. Jojoba oil is lightweight and helps to add shine without weighing the hair down, while cocoa butter provides a creamy texture and a subtle chocolatey scent.
To make this pomade, melt the beeswax and cocoa butter in a double boiler, then add the jojoba oil. Stir the mixture until it is smooth and well combined. Remove from heat and allow it to cool slightly before adding 10 drops of essential oil, such as bergamot or lemon, which have a fresh, citrusy scent. Pour the mixture into containers and allow it to set before use.
Tips for Storing and Using DIY Hair Pomade
Once you have made your DIY hair pomade, it is important to store it properly to ensure it lasts as long as possible. Keep the pomade in a cool, dry place, away from direct sunlight. If you live in a warm climate, you may want to store the pomade in the refrigerator to prevent it from melting.
When using the pomade, start with a small amount and warm it between your hands before applying it to your hair. This will make it easier to distribute evenly and prevent clumping. You can always add more pomade if needed, but it is better to start with less and build up to avoid overloading your hair.
In the final part, we will discuss the environmental and economic benefits of DIY hair pomade, as well as tips for troubleshooting common issues that may arise when making and using homemade pomade.
Environmental and Economic Benefits of DIY Hair Pomade
Reducing Environmental Impact with DIY Hair Pomade
One of the most compelling reasons to make your own hair pomade is the positive impact it can have on the environment. Commercial hair products often come in plastic packaging that contributes to landfill waste. By making your own pomade, you can reduce your reliance on single-use plastics and opt for reusable or biodegradable containers instead. Glass jars or metal tins are excellent choices for storing DIY pomade, as they can be washed and reused multiple times.
Additionally, many commercial hair products contain synthetic chemicals that can be harmful to the environment. When these products are washed down the drain, they can end up in waterways, affecting aquatic life and ecosystems. DIY hair pomade, on the other hand, is made from natural ingredients that are biodegradable and less likely to cause harm to the environment. By choosing to make your own pomade, you are taking a small but meaningful step toward reducing your environmental footprint.
Economic Benefits of DIY Hair Pomade
Making your own hair pomade can also be a cost-effective alternative to purchasing commercial products. High-quality pomades can be expensive, especially if you use them regularly. DIY pomade recipes typically require only a few simple ingredients, many of which are affordable and readily available. For example, beeswax, coconut oil, and shea butter are all relatively inexpensive and can be purchased in bulk, further reducing the cost per use.
In addition to saving money on the product itself, making your own pomade allows you to avoid the markup that comes with branded grooming products. You are paying only for the raw materials, not for the packaging, marketing, or brand name. Over time, the savings can add up, making DIY pomade a smart choice for those who want to maintain a well-groomed appearance without overspending.
Troubleshooting Common Issues with DIY Hair Pomade
While making your own hair pomade is relatively straightforward, you may encounter some challenges along the way. One common issue is achieving the right consistency. If your pomade is too hard, it may be difficult to apply, while if it is too soft, it may not provide enough hold. To fix this, you can adjust the ratio of beeswax to carrier oils. Increasing the amount of beeswax will make the pomade firmer, while adding more oil will make it softer.
Another issue that may arise is separation of ingredients. This can happen if the pomade is not mixed thoroughly or if it is exposed to high temperatures. To prevent separation, make sure to stir the mixture continuously while it is melting and allow it to cool slowly. If separation does occur, you can re-melt the pomade and mix it again to restore a smooth texture.
Some people may find that their DIY pomade has an unpleasant scent, especially if they are using unrefined ingredients like raw shea butter or beeswax. To mask any unwanted odors, you can add a few drops of essential oil to the mixture. Choose oils with strong, pleasant scents, such as lavender, peppermint, or citrus, to create a pomade that smells as good as it works.
Embracing the DIY Hair Pomade Lifestyle
Creating your own hair pomade at home is a rewarding and practical way to take control of your grooming routine. By using natural ingredients, you can avoid the harmful chemicals found in many commercial products and create a pomade that is tailored to your specific hair type and styling needs. Whether you have fine, thick, curly, or straight hair, there is a DIY pomade recipe that will work for you.
In addition to the personal benefits, making your own pomade is an environmentally and economically responsible choice. It allows you to reduce your reliance on single-use plastics and synthetic chemicals, while also saving money on grooming products. With a little practice and experimentation, you can create a high-quality pomade that rivals any store-bought product.
So why not give DIY hair pomade a try? With the right tools, ingredients, and a bit of creativity, you can create a grooming product that is not only effective but also aligns with your values and lifestyle. Whether you are a seasoned DIY enthusiast or a beginner, the process of making your own pomade is sure to be a fun and fulfilling experience.